Thursday, October 29, 2009

Halloween layouts

My sister sent me some Halloween photos to scrap for her album. I love how this page turned out.

I started off with a sheet of white cardstock. I sprayed with green Maya Mist and my own orange mini mister over the big scrolly Tim Holtz mask.

Punches aren't just for paper. I used my new 'swiss cheese holey' punch on the photos. I've been waiting for Lynette to pick this Then I set a few orange eyelets into the medium sized holes; it's been ages since I used eyelets. I matted my photos on white cardstock. The edges are distressed and inked.

The photos are grounded with a couple of strips of Little Yellow Bicycle pp and a piece of MM green dotty tape.

Next I layered the 'One Spooky Night' transparency. It's 12 x 12 with bats up one side, grey scrolls & diamonds, and ric rac around the edges. Love it!

I layered the chunkier embellishments on top of the transparency; a couple of sticker tiles, some Prima flowers with star bling centers and lengths of MM's orange star trim. I wanted something more so I cut some thin(1/2 ") strips of black paper, folded them in half to cover the white backs and then folded them in scrolls around the star trim. I added a BoBunny green button with some black ribbon tied through and called my layout done.

Friday, October 23, 2009

Many Thanks to Tara from Just Like Gram's!


Tara from Just Like Gram's brought over these delicious cupcakes for us the other day. She decorated them beautifully and they were just as good to eat!
We were noticing on her blog that she does Christmas baking. What a great idea for all the busy people who just don't have the time to do it themselves. She does many different things and offers different packages depending on the amount that you need. Why not check her out and enjoy some of her delicious goodies.
Thanks again Tara!

Congratulations Jen!

Jen LouieLynette has brought a new designer on board, Jen Louie. Congratulations to her, we are really happy to have her join us. Look for her exciting and beautiful designs here on the blog and in the store.


Wednesday, October 21, 2009

Adding text to your photos.

Adding journaling or a title right on your photo is easy to do. I added my journaling to this photo of Tikanii before I had it developed. I chose a fun font and made it white so it would stand out against the darker rocks.

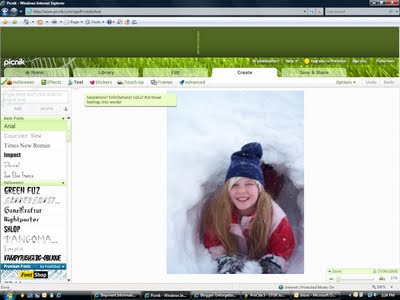
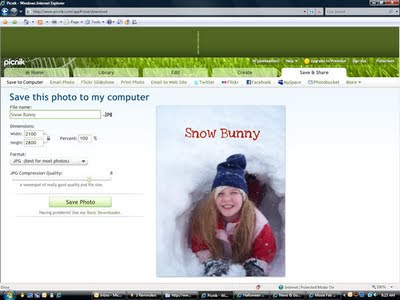
You don't need a fancy program to do this. You can do it online for free at Picnik. It is so easy. And fun! I'll walk you through adding a caption to a photo.
Click here
Hit the 'Get Started' button and create your free account.
Once you've created an account, which takes all of a minute, you will be directed to your 'home'. Click on the Upload Photo button on the left side of the page and choose a photo from your computer.
Once your photo is uploaded click on the 'Create' tab. This is where you'll find all the special effects as well as the text tool.

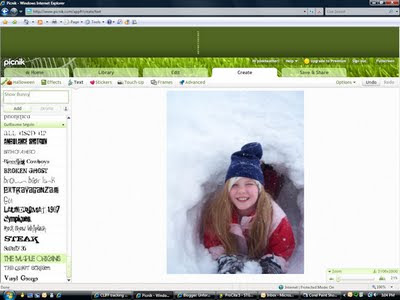
Select the text you want by clicking on it. (it will highlight green)
Above the list of fonts is a window that says 'type here and click ADD to place text'. Type in your title or journaling here.

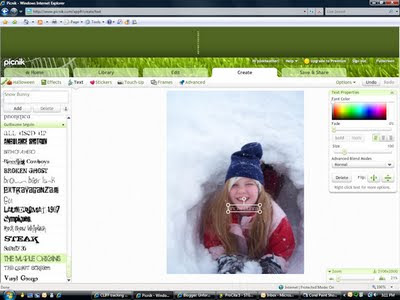
Hit the ADD button and the text will appear on your photo with a box around it. To the right of your photo the text editing options pop up.
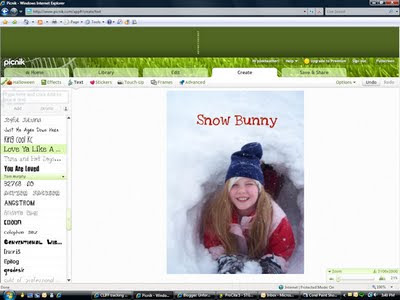
You can now move your text to where you want it. You can change the colour and/or size of your font, as well as play with other options available.

Once your text and photo is as you want it, it's time to save it back to your memory stick or computer. Click on the 'Save & Share' tab. Make sure the 'save to computer' tab is selected (it's the default so you shouldn't need to change anything). Type in your file name in the box at the top. Then hit the green 'Save' button. Browse to the folder (or drive if you are saving it back to your memory stick), and hit save again.


So there you have it. Easy peasy.

Just remember; before you get your photo developed at the store tell Lynette that you've played with it digitally.

Monday, October 19, 2009

Birthday Cake

Today was Hailey's fourth birthday. She saw this pan and insisted this was the cake she wanted. I have never used fondant before and was nervous. It was easy to colour and manipulate. Considering, I have never made a cake of this kind I think it turned out pretty good. My Dad did not believe me that I had made it until I showed him my pink hands from dying the icing! Go ahead you can do it too!

Friday, October 16, 2009

Home is where you hang your heart...

I just finished a Bo Bunny Word album for an upcoming class. The word is "HOME". I used Pebbles paper, Prima flowers and canvas, buttons and stamps. The book will be at Unforgettable Memories as soon as I get the instructions typed up. This book will make a great gift for that hard to buy for person or to keep for yourself and display in your home! Stop by soon and check it out. But for now here is a photo.

Stay tuned for price and dates...

Halloween Cookie House


Lynette has been busy the last few days with new products and services launches so I am posting some pictures of the super Halloween Cookie House that Carol-Lyn and Tyler did.


The kit is from Wilton and is available at the store for under $18.00! It's all ready for you, all you have to do is decorate it. You can finish it in an afternoon.


Why not come into the store and check this out and the other cool Halloween products we have from Wilton!


Wednesday, October 14, 2009

World Card Making day just happened

Did you miss it?
It got me in the mood to make some cards and build up my stash. I managed to use up the last few sheets of my BG Wisteria 6x6 pad on these cards.


I've always wanted to do one of these butterly cards. What a great way to use all those little scraps up. I punched butterflys out of my last few bits and pieces of patterned paper and then glued them in random order on a black card base.


I'm working with My Little Yellow Bicycle's fall line at the moment and used scraps from my layouts to make this card.

Sunday, October 11, 2009

Pop Up Ballerina Birthday Invitation

My daughter's 4th birthday is coming up this month. I am so not a card maker and needed some help. Lynette came to the rescue with this one! She spent a very short time creating this very cute and fun idea to use for the inside of the invitations. I had previously made the ballerina paper dolls knowing that I would use them for these invitations but that is as far as I got by myself.
I used some My Minds Eye paper, Ballerina paper, cardstock, ribbon, crystals, mirror paper, glue, paper trimmer and popdots. I used my Cricut to make the paper dolls and the scallop shape.

To make the inside pop up for a 4x6 inch card:

1. cut the inside paper to 3 7/8 x 11 1/2 inches.

2. score and fold at 5 3/4 inches.

3. cut upwards from fold 1 1/2 inches and downwards 1 1/2 inches 3/8 from the edges and 1/4 inches apart on both sides of card.

4. score 1/4 inch across the top and bottom cuts then fold in.

5. Glue to outside of card.

6. We then added a ballet bar to help stabilize the dancers.

7. One dancers is popdotted to add dimension.


I made the outside all by myself . I just kept telling myself that is was like an embellishment for a page, looked for a little inspiration, picked up some paper, ribbon and picked through my stash. Here is what I came up with.
I can't wait to send these out to out friends and family! Thanks for the guidence Lynette.

Saturday, October 10, 2009

Kids Class Dates...

So we've got the dates on the kids class for the Halloween Hanger.

Class starts at 10:30 and goes to 12:30 for children aged 4-7
and then the class from 1-3 is for children aged 8 and up.

Cost is just $10

Sign up early as space is limited. Call 250-785-2711 or pop by the store!

Friday, October 9, 2009

Lots of Halloween projects

The store has got some really wonderful Halloween lines in recently. I picked up a bunch of it just last week. I think I might play with some project ideas as well as scrapping my Halloween photos. There are lots of ideas on the internet. I started off by checking out the various manufacturers sites and then on to blogs. Here are some of my favourites.

The KI Memories blog has some fun Halloween ideas. I plan on making some Party Crackers with Breanna. And those spooky masks would look awesome on the birch trees in our yard.........

Pink Paislee has a funky witch's hat on their Projects page

Check through Pink Paislee’s blog and you will find plenty more Halloween ideas like this ‘spooky’ birdhouse.

If you like to set up little themed villages Claudine Helmuth has created a spooky village out of paper in her own signature style. The ‘How To’ is on her blog...........

I know Breanna would love to make and wear this pretty Halloween crown. There are lots of creative ways to decorate this template. I’ll show you ours if you show us yours.......

And look at these crows from the same website. They’d look awesome on a shelf with some fall coloured foliage...........

Check out this gorgeous Halloween tree for your table decor.....

Not really scrap related, but this sock skeleton is just too cute to pass on. Remember sock monkeys? Now you can make your own sock skeleton. If your laundry room is anything like mine you’ll have a pile of lone socks just waiting for that perfect craft project. You can find directions here.............

Thursday, October 8, 2009

New Kids UpComing Class!!!


Check it out! Coming up soon we have this super cute kids class happening for Halloween We don't have a day or time yet but be sure to stay tuned as this class has a limited amount of space and will be sure to fill up fast. Also going to need a spot for those fun Halloween photo's? On October 23rd, from 7-9pm Crystal will be teaching this layout called, "A Frightful Tale". This class is only $30.00 and $25.00 for members. To register you can give us a call here or stop by to check it out and sign up. This class has a limited amount of space so be sure to register early.

Monday, October 5, 2009

Prima's October Sketch is up

I never did get around to doing Septembers sketch, but I definitely want to try this one.


If you need anymore inspiration for it check out Prima's blog to see what their DT did with this sketch.

Don't forget to leave us a link if you get around to doing this one.

Saturday, October 3, 2009

Fall Inspiration

I just get so inspired around Fall time. The changing colours of the leaves and cool, crisp air makes me feel refreshed. I know that seems weird but it's like I get one last blast of energy before winter sets in. Today it is freezing. I am thankful that I headed down to the John Curtis pumpkin patch in Taylor last week while it was still nice. Yes, we still have a pumpkin patch. They don't mind if you take some pictures but please be careful of the vines and maybe buy a pumpkin or two as well!

So with my great pumpkin pictures I created this quick, little mini album that can be displayed in your home for the season. This will be a class. Mine is titled Pumpkin Patch. You can call yours whatever you like because the title is stamped on. The paper and embellishments are mostly from Bo Buuny Beautiful Life collection. The pumpkin and vine are cut from the Cricut. Thanks to the Flower Hut for the Floral Wire that I used to embellish my vines!

So if you are interested in joining me check the store soon to see the book. The date and price will be posted soon. Stay tuned or check the newsletter! In the meantime, bundle up, get out there and take some great fall photos. The leaves will be gone all too soon!